
Blog
- Blog
- Cabinet Interiors
- Door styles
- Embellishments
- Finishes and Colors
- Acrylic Colors
- Bamboo Woodtone
- Cherry Woodtone
- Cherry Woodtone with Glaze
- Maple Color
- Maple Color with Glaze
- Maple Woodtone
- Maple Woodtone with Glaze
- Mdf Color
- Mdf Color with Glaze
- Melamine Color
- Melamine Woodtone
- Oak Woodtone
- Purestyle Color
- Purestyle Woodtone
- Rift Oak Woodtone
- Rustic Alder Woodtone
- Rustic Alder Woodtone with Glaze
- Thermofoil Color
- Thermofoil Woodtone
- Hardware
Are Wood Kitchen Cabinets Coming Back in Style?
With the rise of new materials and countless options on the market, there is one question that interests many homeowners: “Are wood kitchen cabinets coming back in style?”. For now, the short answer is “Yes, they are!”. However, in this blog post we’ll try to answer it in greater detail as well as discover types of wood kitchen cabinets and much more.
What Type of Wood Cabinets Are in Style?
Wood is one of the oldest materials for crafting. No wonder wooden furniture is so popular even these days. It makes your home look cozy and warm, like in good old days. And this is only one benefit amongst plenty of others that we’ll get into later.
So, wood is a timeless classic that is currently enjoying a renaissance.
The most common types of wood cabinets in style include oak, cherry, maple, alder, birch, hickory or even chipboard wood kitchen cabinets.
Wood cabinets keep it going on for so long because they can easily pair with literally anything. No matter what style you choose, dark or honey wood kitchen cabinets will only make it better.
Types of Wood Used to Make Wood Kitchen Cabinets
Now we offer to take a closer look at each type of wood used to make kitchen cabinets. We won’t touch upon chipboard wood cabinets since it is the cheapest option possible, plus you can make it look like any type of wood. We’ll better draw your attention to luxurious oak kitchen cabinets first.
Oak Wood Kitchen Cabinets
Oak is a type of hardwood renowned for its strength and sturdiness. It’s also a popular choice for kitchen cabinets, due to its beautiful grain pattern and ease of maintenance. When it comes to selecting kitchen cabinets made from oak, there are two options available:
- Red Oak Cabinets: Red oak is a more common option, as it’s more affordable and easier to work with. It’s characterized by beautiful, straight and curved grain patterns, which can be further enhanced with a stain or paint finish. Even when painted, red oak cabinets still reveal the grain beneath the wood.
- White Oak Cabinets: White oak is more expensive than red oak, but it’s also more durable and has a greater resistance to rot and insect infestation. Its subtle grain pattern gives white oak cabinets a sleek, modern look.
Both options would give you that exact pleasant smell of fresh wood. Many people think that wood absorbs odors well and this is partially true. If oak was correctly polished and painted with special paint, it will be easy to clean and always smell great.
Cherry Wood Kitchen Cabinets
If you’re on the look out for hard-wearing and beautiful kitchen cabinets, look no further than cherry wood. This strong and durable type of wood is known for its unique grain pattern, with small, reddish-brown to blond streaks running through it. When stained, cherry cabinets take on a deep, rich color that adds sophistication to any kitchen space.
Cherry cabinets are especially gorgeous in kitchens with white or cream walls, providing just the right amount of pop and color. Of course, like all hardwoods, cherry wood is susceptible to scratches and dents, but you can keep your cherry wood kitchen cabinets looking good and extend their life by dusting them regularly with a soft cloth and avoiding harsh cleaners.
Cherry wood cabinets offer the perfect balance of strength and beauty, and with proper care, are sure to last for years to come.
Maple Wood Kitchen Cabinets
Maple wood kitchen cabinets offer numerous benefits that make them an ideal choice for any home or office. Here are some of the key advantages of maple wood cabinets:
- Durability: Maple is one of the strongest, most durable hardwoods, making it an ideal choice for kitchen cabinets. Its strength and close grain pattern gives it a smooth texture and makes it perfect for painting or staining. Maple is THAT sturdy that it’s even used for dance floors and bowling alley lanes!
- Aesthetic Appeal: Maple cabinets come in a variety of grain styles: Tiger, Flame and Birdseye to name a few, giving you plenty of options to choose from. For a classic look, go with natural maple cabinets. For a more modern vibe, try white or gray-stained Maple cabinets. Whether you’re searching for a classic look or something more modern, maple cabinets are sure to make a statement.
Overall, maple wood kitchen cabinets are an excellent choice for those who want wood kitchen cabinets but don’t know what type to choose. Thanks to their strength, beauty, and easy maintenance, they are sure to last for years to come and leave you satisfied.
Alder Wood Kitchen Cabinets
Alder wood is a superb choice when it comes to varnishing, boasting excellent surface treatment that will enhance its look. With a medium bending strength of 9,800 psi (67,568.62 kPa), alder wood is an ideal material for kitchen cabinets and other furniture that require a great deal of bending to fit into tight spaces.
Aesthetics are especially important when picking out kitchen cabinets, and with alder wood you get the best of both worlds: a subtle grain pattern that can be enhanced with staining or painting, or left in its natural state for a rustic, weathered look that perfectly complements any design.
Birch Kitchen Cabinets
If you’re looking for high-quality yet not pricey kitchen cabinets made in Canada, birch is your go-to option. It’s a versatile, light-coloured wood that is moderately priced, making it a great choice if you’re on a budget. Plus, you can stain or paint it to match your décor, or use it to create a two-tone look in your kitchen.
Birch cabinets are ideal if you’re looking to brighten up your kitchen or bathroom, or if you want to give them a clean, contemporary look. It takes finishes well, so you can experiment with different colors and stains to get the perfect look.
Hickory Kitchen Cabinets
Hickory is an incredibly strong, heavy, and shock-resistant wood, making it an ideal choice for cabinetry that will see a lot of use. From pantry cabinets and kitchen island cabinets to bathroom vanities, hickory is an ideal choice for custom-made furniture. Its versatile tones, ranging from pale cream to reddish brown, make it an excellent choice for both light and dark-colored cabinets.
However, hickory is quite challenging to work with due to its strength. For this reason, it’s best left to experienced cabinetmakers.
When it comes to selecting wood cabinets, as we have seen there are numerous types to choose from. With each type of wood offering its own unique grain pattern, color, and price, it’s important to pick an option that fits your budget and compliments the overall look of your house.
Canada-based cabinet makers are well-versed in working with hickory and other types of wood, so if you’re looking for high-quality kitchen furniture, be sure to go with an experienced, trusted, and reliable firm. This way, you’ll get the best results without having to worry about costly mistakes or shoddy workmanship.
Reasons Wood Cabinets Are Making a Comeback
People want to make their lives better, and wood cabinets can do just that. Not only are they stylish, but they’re also highly functional. Here are some reasons why wood cabinets are becoming popular again:
- They’re more durable: Wood cabinets are tougher than laminate or particle board, and types such as hickory and oak are designed to stand up to regular use in high-traffic areas.
- They’re easy to clean: Just a quick wipe with a damp cloth and your wood cabinets will be good as new.
- More storage: Outfitting wood cabinets with shelves and drawers is a breeze, which makes them great for those who need a lot of extra storage space.
- Eco-friendly: Wood cabinets are a more sustainable choice than their plastic or metal counterparts. Plus, they can be recycled at the end of their lifecycle.
All-in-all, wood cabinets are a great choice for any kitchen regardless the type of wood they are made of. We are sure that you can find the best option for you in our catalog or order it from our affiliates.
Why Your Kitchen Cabinets May Be Sticky After Cleaning?
Have you ever noticed that your kitchen cabinets get sticky after cleaning them? If so, you’re not alone. Sticky cabinets are a common problem, and it’s usually due to one of two things: either the cabinets were not adequately cleaned, or the cabinets were not protected with a sealant.
As we mentioned before, it is crucial not to use harsh chemicals on your wood cabinets since it can damage them or eliminate protective layers and leave them sticky. Here are some tips how to make your wood kitchen cabinets smooth again:
- Residue from the cleaning product may be left behind if you haven’t washed it properly. This can cause the surface to become sticky. To avoid this, make sure that you thoroughly clean the cabinets.
- All cabinets, regardless of material, should be sealed with a protective coating. This coating helps to prevent dirt, grease, and water from penetrating the surface and leaving it sticky. If you do not seal the cabinets, they are more likely to become sticky over time.
- Clean the cabinets regularly and always apply a protective sealant after cleaning to make future cleaning easier. Make sure to use an appropriate sealant for the material of your cabinets, and ensure that all surfaces are adequately covered.
- If your cabinets are still sticky, try washing them with a mild soap and warm water. If that doesn’t work, you may need to use a specialized cleaner designed for sticky cabinets. However, this should be used as a last resort, as it may damage the finish of your cabinets.
Sticky cabinets can be a nuisance, but they can be easily prevented. With proper maintenance, your cabinets should remain clean and non-sticky for many years.
Wood Kitchen Cabinet Trends in 2023
Wood kitchen cabinets have been a staple of kitchens for decades, and in 2023 they are making a big comeback in style again! Homeowners across the country are recognizing the many benefits of wood kitchen cabinets and are embracing their beauty, functionality, and versatility.
Wood is a timeless material that can be easily tailored to fit any kitchen. Homeowners can bend, stain, or paint wood cabinets to create a unique look that perfectly complements the rest of their kitchen. Plus, wood cabinets come in a variety of grain patterns, giving homeowners the ability to choose one that reflects their individual style.
One of the biggest trends in wood kitchen cabinets in 2023 is the inclusion of modern features. Homeowners are increasingly incorporating cutting-edge technology into their cabinets to give them a more advanced look. This includes things like touch-activated lighting, built-in charging stations, and even voice-activated controls. Additionally, many cabinetry manufacturers are offering customization options, such as built-in storage solutions, to make their cabinets even more tailored to their clients’ needs.
More and more homeowners are choosing to invest in high-quality, custom-made cabinets. Customization allows homeowners to get cabinets that perfectly fit their space and their style. Plus, custom-made cabinets are often more durable and longer lasting than pre-made ones.
Overall, wood kitchen cabinets remain a popular choice among homeowners in 2023 and, probably, more years to come. Modern features, sustainability, and customization are making them even more attractive. Wood is an ageless material that can easily be tailored to fit any kitchen and will last for decades.
Final Thoughts
Wood cabinets are making a comeback in style, and for good reason: they bring together beauty and functionality. Homeowners find them easier to work with due to their customizable nature — you can easily bend, stain, or paint wood cabinets to fit your kitchen.
What’s more, wood is a highly versatile material, with a range of grain patterns to choose from. Pick a pattern that complements your home or one that expresses your own style. We understand that a kitchen is more than just a place to cook – it’s a place to gather, laugh, and make memories. That’s why we strive to make sure your kitchen is the best it can be. We offer all-in-one service, so you can rest assured knowing you’re getting the best quality kitchen furniture available.
How To Measure A Kitchen Sink
When measuring your kitchen sink, there are in fact a number of factors to keep in mind, even if it might seem like one of the simpler and more reasonable DIY household tasks. By taking precise measurements, you can guarantee that the sink will fit your space correctly and that the installation process will go without a hitch.
What You Need To Know Before Measuring Your Kitchen Sink
It’s crucial to determine what kind of replacement you require before starting the kitchen sink measurement process. Important considerations include the size of the basin, the depth of the countertop, and the proportions of the cut-out. The size and measurements of the waste drop must also be known if you’re replacing an undermount sink. After compiling all of this data, you may start measuring your kitchen sink.
Once you have gathered all of this information, you can begin measuring your kitchen sink.
The Best Way To Measure It?
To ensure your new kitchen sink will fit properly, you’ll need to take some measurements. With a few simple tools, you can easily get the dimensions you need.
Here’s how:
1. You’ll need a tape measure in order to figure out the dimensions of your sink that’s currently in place.
2. Write down these numbers or take a picture of them so you have them handy when shopping for a new sink.
3. When looking at potential new sinks, pay attention to the dimensions listed in the product description.
4. Compare these numbers to the ones you took for your old sink.
5. If you’re unsure about whether or not a particular sink will fit, don’t hesitate to ask a sales associate for help. They are usually more than happy to answer any questions you may have.
6. Remember that many sinks come with an overflow drain which means they are deeper than they are wide, while others are wider than they are deep.
7. The other thing to keep in mind is that the more square footage there is between your countertops and back wall, the bigger your sink should be for maximum efficiency of space use.
8. Once you’ve found a perfect match for size and shape, it’s time to buy!
Follow these tips to make sure you end up with the best possible deal:
- Shop around for a good price. If one store has something you like, call another store and see if they offer similar pricing – sometimes competition drives prices down even further! Don’t be afraid to spend some time on this step – it could save you quite a bit of money in the long run.
- Ask about special deals or discounts that might apply based on certain circumstances (such as buying multiple items). There are often times when stores will offer extra savings if you purchase two or more items together; just make sure they’re compatible before committing to anything!
How To Mark The Placement Of Your New Sink
The first step is to find the center of your current sink. In order to figure this out, you’ll have to take some measurements of the cabinet width from each direction and then divide that number by two. Then, measure the length of the cabinet from front to back and divide by two.
The point where these two lines intersect will be the center of your cabinet. Place one end of the measuring tape on that point and stretch it across to the other side of the cabinet. That distance is called the total reach for your new sink. You’ll need that measurement when you purchase a new sink or faucet set (of course!).
Once you have it, start marking out each corner of your new fixture with a pencil so you know exactly where to drill in screws or nails later on. You can then use these markings as guidelines to keep your new sink level when installing it into the countertop opening.
Preparing Your Kitchen Sink For Installation
After taking the applicable measurements, the next step is installing the sink and plumbing lines according to the instructions included with your purchase. Afterward, you can begin using your new sink! Keep in mind that your new sink should extend past the front edge of the countertop by 1⁄2 inch on all sides if it’s not self-rimming (if it is self-rimming then it doesn’t matter).
For an undermount installation, make sure there’s 1⁄4 inch clearance between the underside of the sink and bottom surface where it meets up with adjacent cabinets or cabinetry If this clearance isn’t maintained, water may leak from underneath. If you’re installing a drop-in sink, check for access holes in the cabinet below.
- If necessary, drill them out before proceeding to install the drop-in sink and follow the manufacturer’s instructions for securing it into place.
- When installing an overmount basinet onto top of your existing kitchen cabinet or baseboard molding, install two support brackets at each end of the rim.
- Next, attach support braces along the wall above.
- Finally, fasten screws through both sets of brackets until they meet at the center so they are secure.
Place drywall anchors at each end of each bracket if needed before tightening screws completely until flush against the wall.
Benefits Of Installing A New Kitchen Sink
If you want to replace your old sink with a newer model, there are several benefits to doing so:
- Sinks come in all shapes and sizes, so you can pick one that fits your kitchen’s style. You might also want to choose a style that complements your countertops and other fixtures.
- Newer sinks have more modern features like pull-out spray heads, which make it easier to clean dishes or wash your hands. They also often come with drainage racks that help keep the area around the sink clear of spills.
- A new sink will likely last longer than one that’s been damaged by years of wear and tear or stained by food particles from your cooking adventures.
- You may need to replace parts such as faucets at some point anyway — especially if they’re old or leaking — so why not save yourself some money by installing a whole new sink at once?
Key Takeaways
When measuring your kitchen sink, the most crucial thing to keep in mind is to take accurate measurements. Get the length of the sink, the width, and the depth using a tape measure. You’ll want to make sure that you write all of these measurements down the first time you take them so you don’t have to repeat the process twice.
You may start looking for a new kitchen sink that will properly fit your area after you have your measurements.
Kitchen Island Overhang
A kitchen island overhang is a perfect addition to any kitchen it’s installed in, and it can increase the resale value and overall aesthetics of a home.
When you’re designing a kitchen, one of the most crucial design elements to pay attention to is the overall height of your kitchen island overhang. This can make or break the aesthetic appeal of how your kitchen will look, so you need to have it right! Keep reading this post to learn everything you need to know about kitchen island overhangs.
What Is A Kitchen Island Overhang?
A kitchen island overhang is a countertop that goes further and extends past the edge of the island, typically more on one side. One reason why this is done is to create additional seating or counter space. The standard overhang is 12 inches, but it can range from 8-18 inches.
The recommended amount of overhang is between 10-15 inches. If you have stools at your island, you’ll want to be confident that there’s ample room for people to comfortably sit without their knees hitting the top of the countertop. And if you’re using an overhang that goes above a dishwasher, be sure not to block the exhaust vent.
Proper ventilation will prevent toxic fumes from being released into your home. You should also note that installing an under-counter dishwasher will require the installation of a sink or fill line and water and drain connections to work properly.
What Are The Advantages Of Having A Kitchen Island Overhang?
A kitchen island overhang is known to be a useful way to add extra counter space to your kitchen. It allows you to have a place to sit and eat in your kitchen. Plus, it can assist you in keeping your kitchen organized and tidy.
Some other advantages of having a kitchen island overhang:
- You can use it as extra preparation space when cooking.
- It’s a great place to store cookbooks or spices.
- You can use it as a breakfast bar or quick dining spot.
- It’s a great place to entertain guests while cooking.
- It provides extra storage underneath for pots, pans, or small appliances.
- If you have an open-concept kitchen, this would be a great bonus.
- Lastly, it helps make the overall design more cohesive.
It’s a great place to put extra appliances, like a microwave. A lot of times they’re on top of your cabinets, but with an island overhang, you have more space to utilize. You can even make it portable so that you can move it around if you need to for large events or parties! It also makes room for your kitchen table or even a breakfast bar to eat on.
How Can I Choose The Right Size And Style?
When it comes to kitchen island overhangs, size and style are everything. The wrong size can make your kitchen feel cramped, while the wrong style can make it feel out of date.
Here are a few tips to help you figure out the exact dimensions, size, and style for your kitchen island overhang:
- The first step is to measure the space you have available. You’ll need to account for the width of the island, as well as any other appliances or furniture that might be in the way.
- Once you know how much space you have to work with, you can start shopping for a style that fits your kitchen. If you have a modern kitchen, you might want a sleek, minimalist overhang.
- If you have a traditional kitchen, on the other hand, you might prefer something with more detail and a few ornamental elements.
- You’ll also want to think about your own personal style. Do you prefer a classic look or something more contemporary?
How To Install A Kitchen Island Overhang
If you’re considering adding an island to your kitchen, one of the first things you’ll need to decide is how big the overhang should be. The size of the overhang will depend on a few factors, including the height of your ceilings, the height of your kitchen counters, and how much space you have in your kitchen. Once you’ve decided on the size of the overhang, you’ll need to install it.
Installing an island overhang can be a great way to create more space in your kitchen. An island overhang is a set of cabinets that hang from the ceiling and extend beyond the edge of the island, providing extra storage and countertop space.
If you’re interested in adding an island overhang to your home, we’ve got some tips for you:
1. Measure your island.
The first step to installing an island overhang is measuring your island. If you don’t have one yet, we recommend checking out our blog post on how to build a kitchen island before installing one. Once you know the measurements of your existing or planned island, it’s time to measure the ceiling height above it.
Determine the height of your kitchen island using the measurements from the manufacturer’s instructions. The top of the island should be at least 2 inches lower than the top of your countertop. If you have an existing island, measure from its top edge to your countertop to calculate the correct height.
If possible, measure from the floor up to make sure there’s enough clearance without hitting any pipes or obstructions like beams or ductwork. You’ll want at least 18 inches of clearance above your island so that there’s room for cabinet doors and drawers beneath them.
If this isn’t possible due to low ceilings or other obstructions in the way, then consider building two smaller islands instead of one large one so they can be placed closer together under a single overhang.
2. Mark the locations of the two side beams on both ends of the island using a pencil or chalk line.
3. Place braces on both sides of each beam and screw them in place using a drill with a Phillips head bit and an electric screwdriver with a clutch setting (to avoid stripping screws).
4. Cut two pieces of plywood that are at least 2 inches wider than your exterior wall or ceiling joists, then slide them underneath the beams so they rest on top of them; secure them by screwing through each board into the joist below it with 1-inch screws (be sure not to go through all three layers of plywood).
For kitchen island overhang bracket installtation
1. Install the Brackets
The first step in installing the kitchen island overhang brackets is to cut holes in the top of your cabinets where you want the brackets installed. The holes should be centered on each side of each cabinet door. You can use a drill or power saw to make the necessary cuts.
2. Install the Overhang
Once you have cut holes in your cabinets for the mounting brackets, place them into position on top of each cabinet door using screws or nails through predrilled holes in each bracket. The screws should go into studs behind each cabinet door for maximum strength.
Place the kitchen island overhang on top of your existing structure and secure it in place with more nails or screws through each corner into your existing structure’s legs.
Final Thoughts
Installing a kitchen island overhang can seem like a confusing task for those that have never thought about doing it before. By following these steps, you`ll have a better idea of what to expect when you’re trying to figure out how to install it.
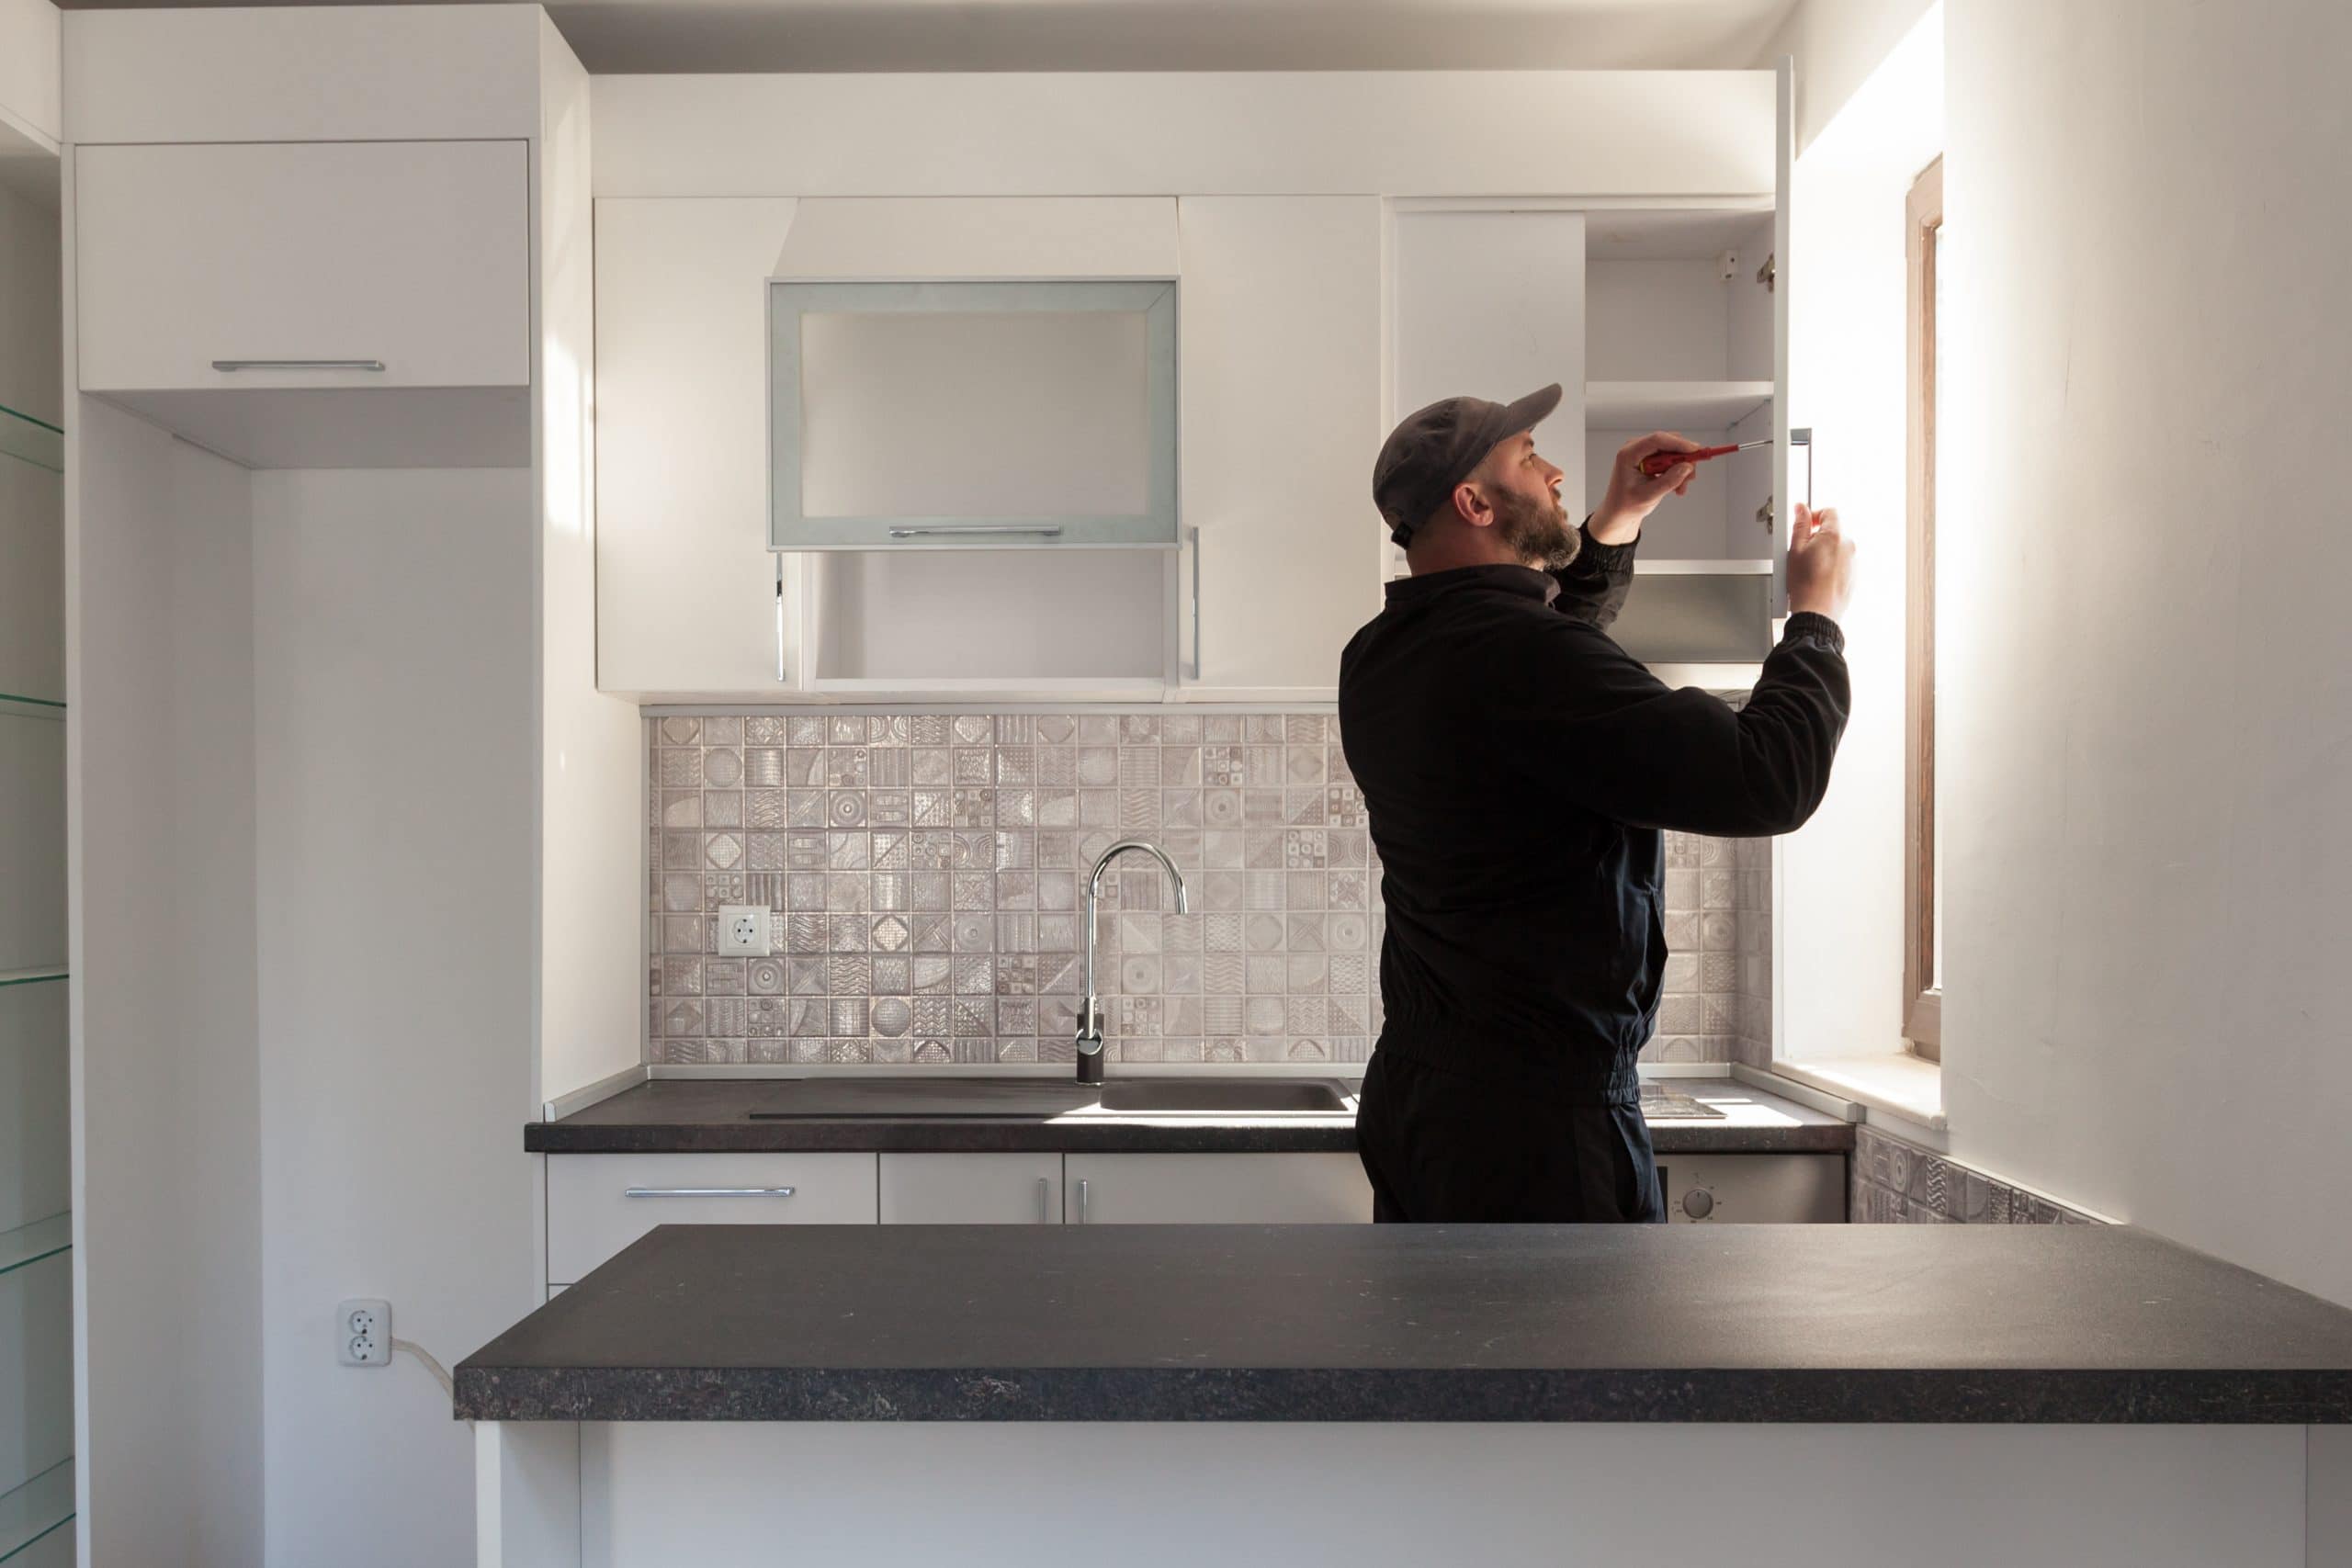
How To Install Kitchen Cabinets
How to install kitchen cabinets? Installing your own kitchen cabinets is a fairly complicated process at first glance. However, it can be done with your own hands, if you prepare for it properly and approach the task responsibly. This way you can save on the service of hiring a specialist. But to install kitchen cabinets, you will still need outside help, as you will have to hold the furniture to fix it on the wall. How to install kitchen cabinets will tell you further below.
Preparing to install
Before you start the installation, you need to prepare a set of tools. You will need:
- a universal screwdriver with nozzles for drilling holes;
- tape measure, knife, and level;
- Phillips screwdriver, screws, and self-tapping screws;
- an impact driver and an angle.
Once the tools have been prepared, you should proceed directly to the installation process. First, take a level and make sure that all the walls in the kitchen are level. To check the rightness of the corners, you will need a construction angle. If there are any irregularities, you should fix this before you start installing the kitchen cabinets.
Also, don’t forget to take care of the electrical wiring and take out wires to connect the stove, oven, hood, microwave, and other appliances. Also consider light fixtures, faucets, and drain lines.
Marking lines for installing kitchen cabinets
First, you should determine the highest level on the floor. This can be done with a tape measure. Mark the reference line. It will be about 48 inches from the floor. Draw a horizontal strip along with these marks and measure the distance from the floor in several places. Where the lowest value will be is the top point. When it is marked, you can determine the height of the upper cabinets. Usually, this distance is no more than 34 inches.
From the top point, measure approximately 18 inches upward. This is where the upper cabinets will be located. Draw lines as they will hang. Where the lines are, mark the top and bottom points to secure the cabinets. Drill small holes in them, take the studs, and screw them into the markings, but not completely. Try on the cabinets and appliances. If it doesn’t fit, straighten out all the lines and make other marks.
Installing the upper cabinets
Before installing the cabinets, it is recommended to remove the doors, drawers, and shelves from them, so that the furniture is more convenient and easier to install. You should then mark the entire set with tape to make it easier to put everything back in place. Install the straight bar at the top of the cabinets and slightly below. Take two-inch screws and secure them through the drywall into every other rack.
Place the kitchen cabinet on the floor and align the face frame so that it matches the adjacent ones. This means that all the cabinets should be level. They need to be fastened together with screws. Drill holes through the edge of the face frame at the top and bottom. They should be fastened together with special screws. To do this, use a drill with a screwdriver.
Fixing the upper cabinets
At this stage, the help of other people will be required, because the construction will need to be lifted and held. The cabinets should be placed in the corner first so that they can be secured later. Then check with a level on the front side for evenness. If all is well, you should take 2.5-inch screws and screw them into the back of the cabinet. Spacers should be used where the posts are located for good fixing.
If the cabinet is installed correctly, all edges should line up with the mark you have pre-drawn. Secure all the cabinets by the plank. This will require holding each of them one by one. If you don’t have help, support the cabinets with a jack or other objects. Align all of their borders on the drawn line so that the furniture is evenly bolted down. Orient yourself to the first cabinet that is fixed. After installing the kitchen cabinets, you need to close the resulting gaps with special building materials.
Installing the corner cabinet
Place the side corner cabinet where it should stand. Lift it off the floor until the outer edge meets the marking line. If there are plumbing lines, you should make chalk marks on the back of the cabinets to cut out later. After that, you need to turn the cabinets over and drill all the necessary holes. This will require a circular saw.
When all the necessary holes are made, secure the cabinets with a screwdriver. Check the front side to make sure it is upright. You can use a construction level to do this. If it is not, you need to take adjustment shims and put them between the floor and the legs. When the cabinet is adjusted in height, it should be screwed through the back with screws.
Installing the base cabinets
Once the corner cabinet is installed, all the other cabinets should be attached to it as well. Slide the base cabinets toward the corner cabinet and make sure everything is level. Align each one so that the front side is level. Fasten them together with two-inch screws. On the gaskets, insert the screws and trim off the excess. Use a stationary knife to do this. The gaskets should not protrude over the edges of the cabinet. Remove all the supports and place the shelves and drawers inside.
Securing the pieces
Once the cabinets have been installed, you should hang the doors. If they are laid on, you must first adjust the hinges with a screwdriver. If the doors are inset, you should tighten the hinges so that the doors are flush with the front frame of the cabinet when they close and a small gap is left around the perimeter. Attach the trim for the backers to the lower cabinets. This will require taking 1-inch rods.
Always attach the longer pieces first, and then the shorter pieces. It’s best to trim all of their protruding parts at once. Cover any gaps between the floor and the cabinet with shoe molding. Deepen the protruding nail heads with a hammer. Coat them with wood putty or a special wax on top.
If you used moldings, bevel the joints on the outside corners and trim the inside corners. Align the bottom edge of the molding with the marking line over the tops of the doors. Secure with 1-2 inch nails. Secure the end pieces of the molding with adhesive. Deepen the nail heads with a hammer and wax them.
How to install kitchen cabinets: final thoughts
Installing kitchen cabinets — is a rather time-consuming and complex process. However, using our guide, you will be able to fix the furniture with your own hands without any problems. If you doubt your abilities, use the help of a specialist, but keep in mind: that the service will cost you 100-200 dollars per linear pound. If you want to save money, installing the kitchen cabinets yourself is better. Have patience, follow our instructions and you will succeed!
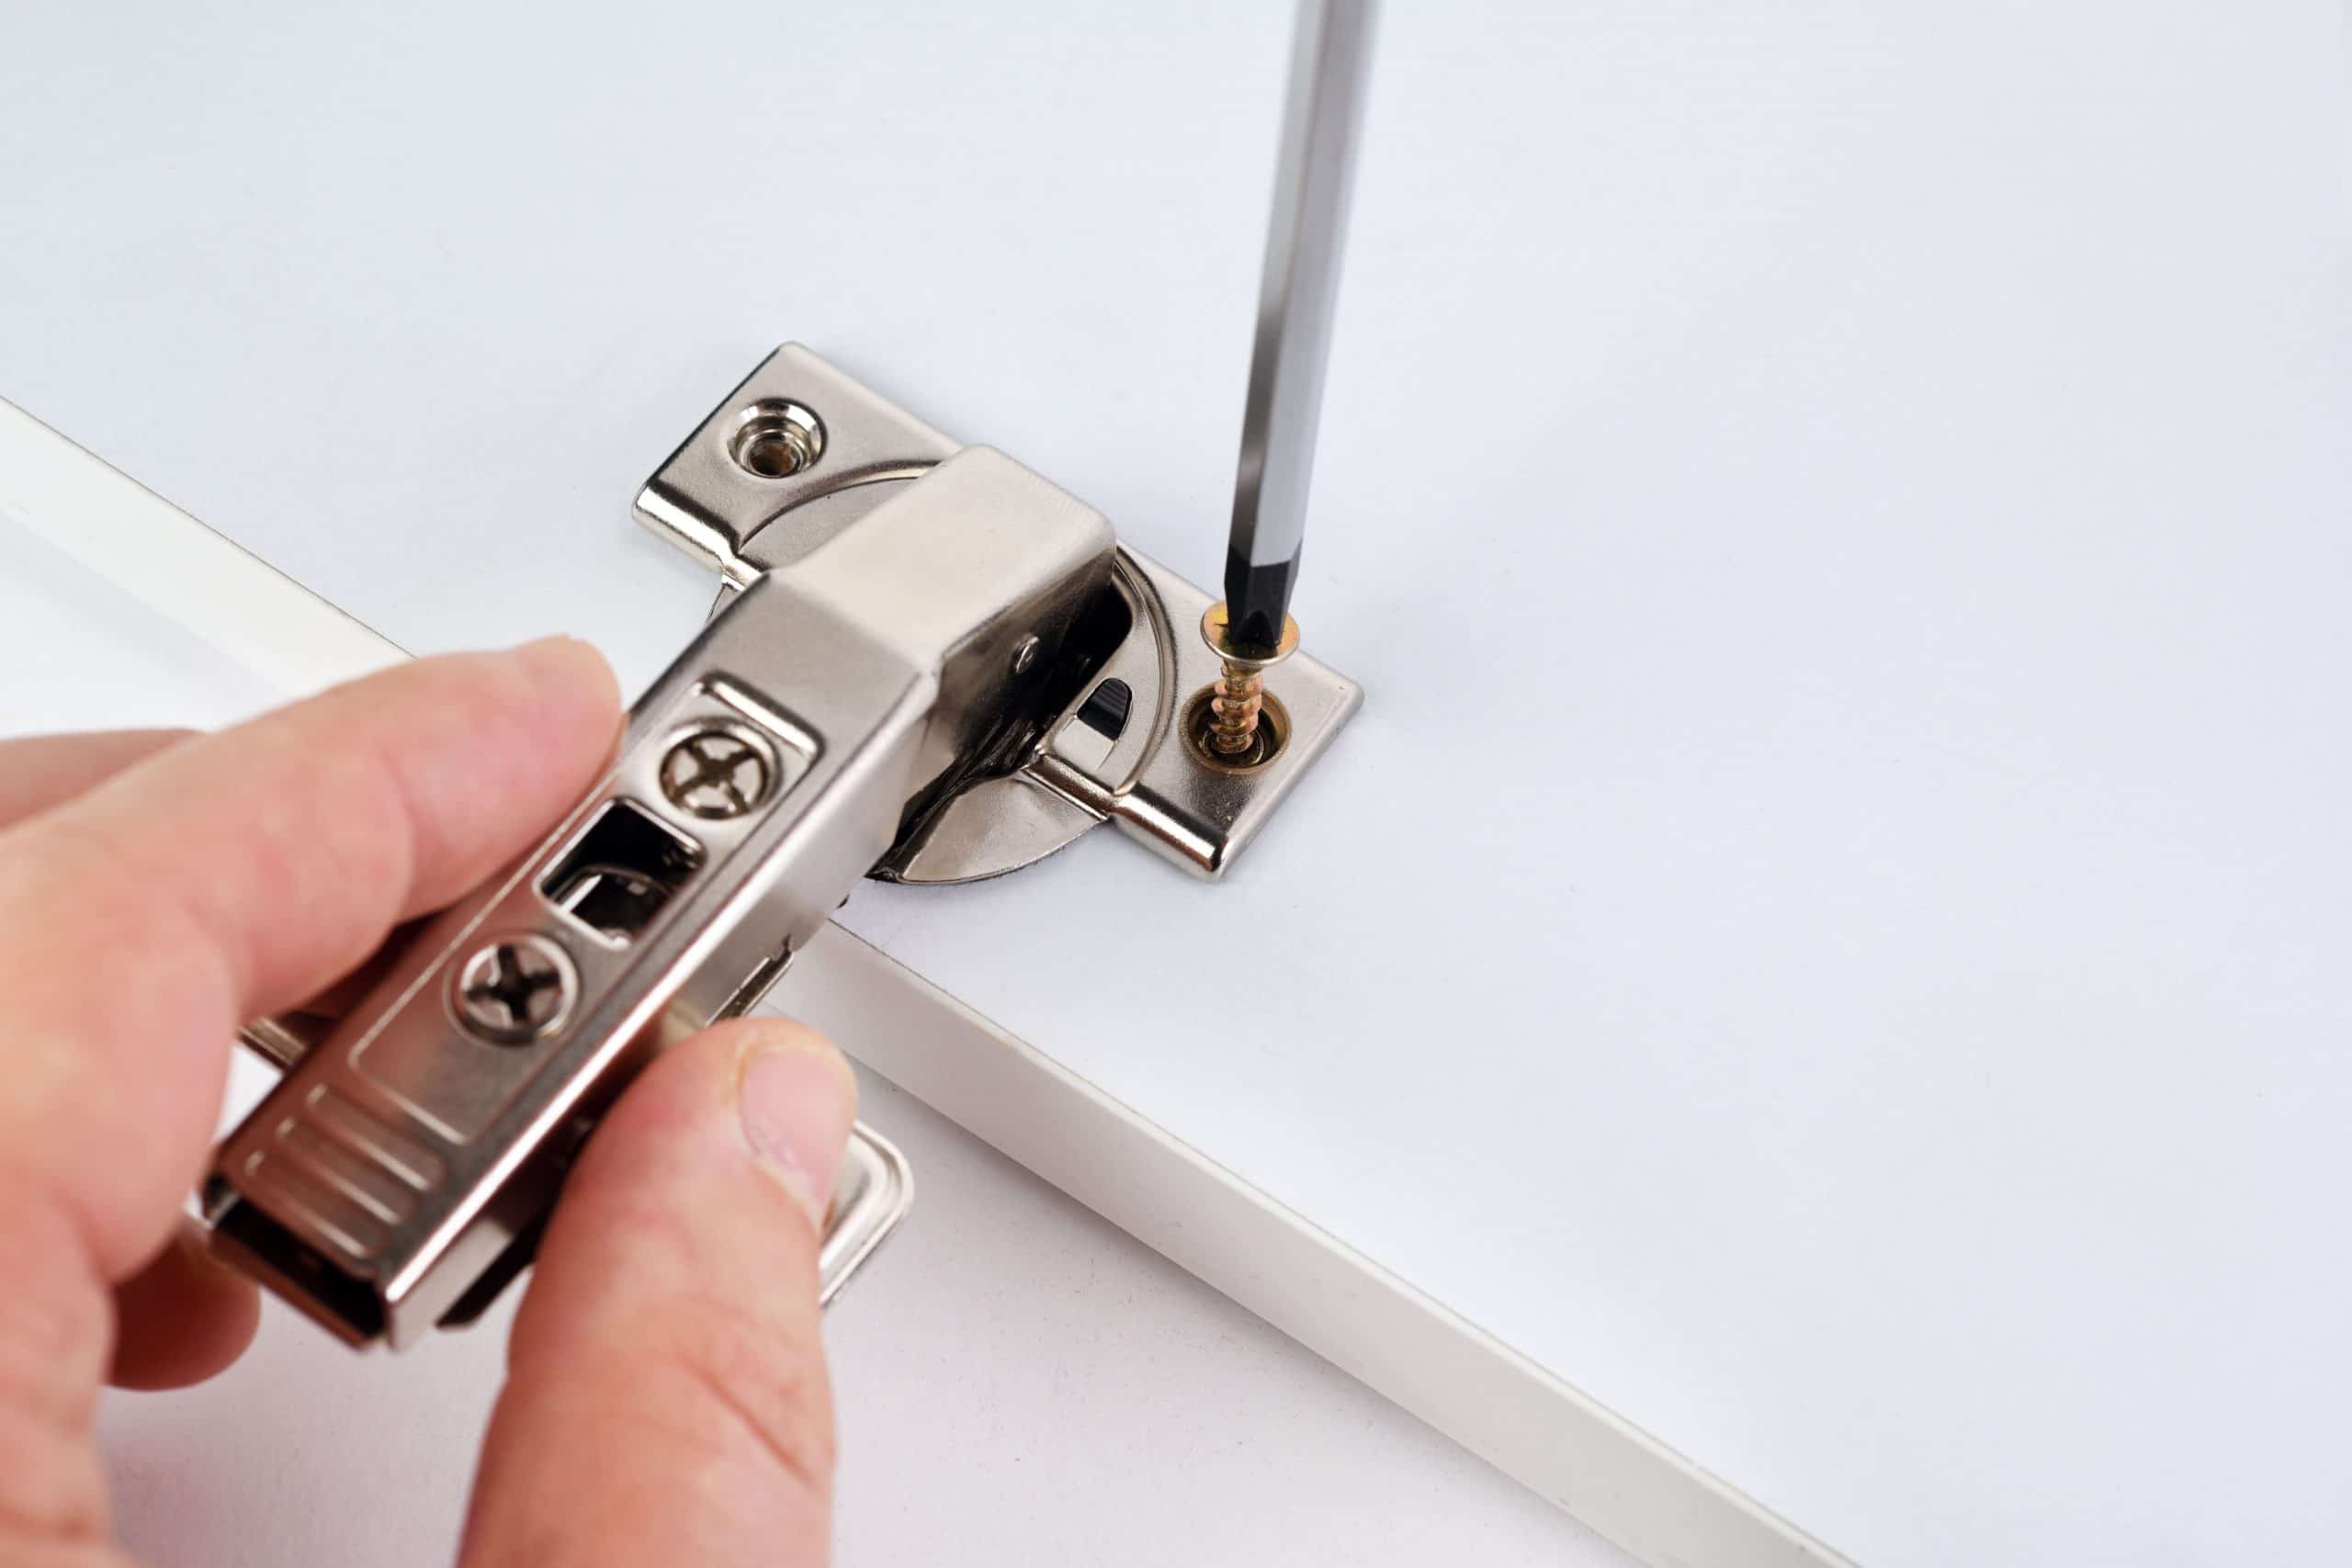
How To Adjust Kitchen Cabinet Hinges: Easy And Cheap Ways
Sooner or later, kitchen cabinets stop closing properly due to the displacement of their doors, which certainly can not help but be annoying. To fix this problem, you can try to adjust the cabinet hinges yourself. This solution is the easiest and cheapest, so it is considered one of the best options when the budget is limited. In addition, even someone new to tools can cope with it. How to adjust kitchen cabinet hinges with your own hands – we will tell in our article.
Preparing to adjust the kitchen cabinet hinges
Before you start adjusting, you need to check the type of hinges on the cabinet. Today, most kitchen furniture comes with adjustable hinges. They can be tightened in different directions: up and down, right and left, inward and outward. Some hinges are adjustable sideways and inward, while others are height and outward. Most are aligned with the screws that hold them to the cabinet.
You should pay attention to the number of screws. If there are two or more screws in addition to the fasteners, then the hinges can be easily adjusted. You will need only one tool to repair the cabinet – an ordinary Phillips screwdriver with a №2 tip. It is better not to use an electric drill with a screwdriver bit, as you can damage the wood and tear off the screw heads.
How to adjust kitchen cabinet hinges: step by step instructions
Once you have made sure that the screws on the cabinet can be adjusted, you can begin the procedure of adjusting the hinges. Prepare a Phillips screwdriver and spare screws just in case. Follow the instructions below.
Tightening loose screws
Often the problem with poor closing of kitchen cabinets is not due to misaligned doors, but to loose screws. To check this, open the cabinet and look at the hinges that secure the doors to the box. They should have two screws on top and bottom. They should be turned clockwise with a screwdriver. Turn the screws all the way through to make sure the door is secure. Try opening and closing the cabinet. If the problem persists, proceed to the next step.
Adjusting the door down and up
If one of the doors protrudes at the bottom or top, you should look for screws that will allow you to adjust the hinges down or up. They usually have oval-shaped holes. When you have found these, proceed step by step according to the diagram:
- Loosen the mounting screws on both hinges slightly. Usually, it is enough to turn a screwdriver a quarter-turn counterclockwise. But do not overdo it, the screws should be a little tight.
- Carefully close the kitchen cabinet door and try to move it to the desired height.
- Carefully open the door and make sure it has not moved out of position.
- Tighten the screws with a screwdriver if the door is at the proper height.
The final step is to close the cabinet and make sure the door is at the correct height.
Adjusting the door on the sides
If the door doesn’t close tightly or is skewed, you can try adjusting it to the right or left. To do this, you should use the cross hinge adjustment feature. This way you can align both doors. In doing so, you can tighten one or two hinges, depending on how much the door needs to be adjusted. Try adjusting the bottom hinge first by tightening the screws tighter. If the door does not level out, do the same with the top hinge.
Adjusting the door outward or inward
Often, seasonal changes in humidity cause wooden doors to warp. A gap appears between them and the frame and they do not close tightly. In addition, the door may bounce when closing and opening. To correct this problem, you need to adjust the door with depth screws.
If the door is lagging behind the box at the top, you should tighten the screws on the hinges at the top toward the cabinet. If there is a gap at the bottom, do the same, but with the bottom hinges.
Final Tests
After each minor adjustment, you should open and close the cabinet doors. This way you can see if you are doing everything right. Adjustment is a procedure that requires patience and time. If something doesn’t work, try again and again. Accurate adjustments are necessary for this endeavor so that the cabinet can last for a long time to come.
What to do if the closet hinges are old
Some homeowners prefer to keep antique furniture with exquisite designs at home. Typically, these cabinets have non-adjustable hinges. They are designed for surface mounting and are fixed to the front of the cabinet. Some kitchen furniture models can adjust the doors up or down, thanks to elongated holes on the hinges.
If they are missing, the only way out is to move the hinges themselves to another location. But note that in this case, the surface of the doors will remain holes. However, this is not critical, because they will be on the inside of the cabinet and will not be visible.
What to do if a group of cabinet doors does not look flat
If you had to adjust multiple doors, your main goal is to get them to align as one. Don’t pay too much attention to getting them perfectly upright. The main thing is to make sure that the doors match up well with the surrounding elements of the cabinet. For example, match its edges, front, and drawers.
Doors can be set up a little irregularly, but as long as they will open and close normally, it shouldn’t interfere with their use. If you still want to achieve perfect alignment, you should take a laser level that you can use to draw horizontal and vertical lines. This will allow you to adjust the hinges of the cabinet in the right position so that its doors look good in the overall interior of the house.
If you can’t adjust the doors yourself, ask for help from experienced professionals. Still, let’s hope that our recommendations will help you cope with this problem on your own. Take your time, try different variants of adjustment and you are sure to succeed!
Kitchen Trends 2022: Ideas & Inspiration
The kitchen is the main place in any home, so it takes a lot of time to choose an interesting and unusual design as there are various kitchen trends 2022. However, you can easily find the ideal one with the help of this article. Keep reading to learn more about new trends and what to avoid today.
What is better to choose in 2022?
Choosing a design for a kitchen is always a difficult process. There is a huge number of ideas, both modern minimalism, and traditional. Fashion in kitchen design does not change so often. The right decision is to choose a style for yourself. It means to find a design that you will like the most, so it will reflect your worldview and inspiration.
However, there are three main styles that have been popular for several years – minimalism, eco, and retro style. The contrast of nature and modern technology – this is how the kitchen design of 2022 can be generally defined.
Kitchen trends to avoid
Choosing a design from hundreds of options you still can find some out fashioned designs or small details in these designs that can ruin the total look of your kitchen. If you really want your kitchen to be modern and stylish, then it’s a great idea to know what you should avoid.
Under-cabinet lights
You have probably heard about such lighting. It is not surprising as it has become increasingly popular in recent years. Moreover, even brands have launched products to help you light up your kitchen in the dark. However, nowadays it is not a great idea. Do you know that manufacturing such lights is usually done in ways that are harmful to the environment? If you choose eco-style for your kitchen, then try to avoid under-cabinet lights.
Huge amount of decorative elements
Of course, using decorative elements is not a bad option, but only if they are used correctly. Do not try to place something similar to patterns, monograms, and other elements on every piece of furniture.
Bigger fridges
Mistakenly, people believe that the bigger the fridge, the better. However, when we talk about modern design ideas of any kitchen it is better to install the classic fridge. Instead of something really huge that takes up a lot of space, you can have one fridge that is more energy-efficient.
Lots of gadgets and tools
One more mistake is that some people try to fill the kitchen with different gadgets and tools. It makes your kitchen look confusing, disorganized, and not as useful as it could be. Moreover, it is a bit difficult to use all these things just because you will not have enough time to read instructions and understand how to use each of them. Also, this will take up a lot of space and it will constantly distract your attention.
All these tips do not mean that you never need to update your kitchen. However, when choosing a design, you should be more careful and try not to use too many different items.
Kitchen design trends 2022
When you know some details about what to choose and avoid, it’s high time to discover interesting kitchen trends 2022. Here we will tell you about some interesting ideas for your kitchen so it will be much easier to find a perfect one.
Minimalism
Today, the minimalistic style often consists of shiny lacquered facades of a white kitchen set and, of course, simplicity of forms. Such solutions will give the space not only a modern look but also make it visually wider.
Minimalism allows you to create a comfortable, functional interior without a huge amount of unnecessary details. The main idea of minimalism is as much free space as possible.
Designers use furniture of regular geometric shapes with clear or streamlined edges for a minimalist kitchen but without unnecessary details.
As a color palette for such a kitchen, you can choose the following tones:
- White;
- Gray;
- Beige;
- Black.
You can combine these colors to create a comfortable atmosphere. They are perfectly combined with each other. Moreover, such colors contribute to the visual expansion of space.
Retro style
Another very interesting style that has remained popular for a long time is the retro style. Such kitchens are distinguished by their unique charm and comfort. However, you should remember that it is quite difficult to create such a kitchen because you need to understand a lot of nuances.
It is possible to find two different ideas. The first is a romantic kitchen filled with decorated cabinets and flowered curtains. The second version of the retro-style kitchen is a combination of dark and light colors, smooth facades of cabinets. A typical element here will be a carpet with an interesting pattern, paintings on the walls, creating a stylish interior.
Here are some tips that help you to choose the right kitchen design in retro style.
- Choose the style of only one decade, so as not to create a feeling of congestion and inconsistency.
- Choose bright colors.
- Try to pick up patterns characteristic of that time.
- Choose natural materials.
Eco-style
The eco-style of modern interiors is a person’s desire to live in harmony with the surrounding world and nature. What does this mean? In the arrangement of the kitchen in eco-style, you can use not only natural materials but also renewable in nature, recycled and easily recyclable ones.
An eco-style kitchen should be decorated in soft, natural shades: white, light gray, beige. Pastel shades are used as accents and additional colors, as well as saturated, but not really bright colors – light and dark brown, green, yellow, blue, olive.
As for furniture, in such a kitchen it is worth choosing furniture made of wood, stone, rattan, and others close to natural design. It has smooth, natural, or conversely, strict straight lines.
Loft
A loft-style kitchen is an ideal solution for people who keep up with the times and live dynamically. When planning a kitchen in this style, you can add various materials such as concrete, metal, and glass. Moreover, the use of non-standard decorative elements perfectly suits this style.
However, the loft-style is more suitable for large kitchens, as it is important to divide the entire space into three working areas. This style does not accept piles of furniture, household appliances, accessories.
As for the choice of color for the kitchen in general, cold natural colors are better suited: gray, white, brick, beige, terracotta.
Scandinavian style
One more extremely popular style these days is a Scandinavian one. You may find a lot of different ideas for planning your kitchen this way. Although it is quite similar to the minimalistic style, it still has its own features so that is the main reason why many people prefer the Scandinavian style to others.
The peculiarity of the Scandinavian style in the interior is that it allows you to use different materials in decoration. Moreover, functionality and practicality are more important in this style.
The most popular color for interior decoration of the Scandinavian kitchen can be white. One more color that is often used in combination with white is black. This solution allows you to emphasize some details, making the space more spectacular.
Materials for creating a kitchen 2022
When choosing the perfect design don’t forget about material for the kitchen as it plays a huge role in the total look. There are a huge number of different materials, but if you really want a stylish kitchen, then you should pay attention to the following:
Wooden material
Eco-materials have become increasingly common in modern kitchen designs. This material is very convenient in order to become a key aspect of the interior of a modern kitchen. It is not necessary to make the whole kitchen out of wood, you can use wooden elements in the design of countertops or furniture and the kitchen will look different.
Ceramic tiles
Unusual decorative tiles for the kitchen, walls, and floor are an excellent, durable, and aesthetically attractive material for interior design. Ceramic tiles are often used due to their unpretentiousness, high strength, and a wide range of unusual tile models.
Natural stones
Natural stones have become really popular recently. It is not surprising because it is a strong and durable material and most rocks are resistant to moisture and heat. Moreover, they are safe in their composition, hypoallergenic, and do not emit harmful substances.
Glass
Glass is one of the materials that have the ability to bring a sense of spaciousness into the design of the kitchen. The material is characterized by high strength, can be transparent or even painted. You can use glass as an independent element or simply as an addition to another design.
Kitchen color trends 2022
One more essential thing in planning a kitchen is the colors you choose. You can find good quality appliances, create a perfect layout and stop. However, what about the colors of the kitchen? You should understand that small details usually create the final look so pay attention to the shades and colors you choose as they can easily ruin your kitchen.
Here we are going to give you the list of popular colors and their shades for the kitchen in 2022.
- Green tones;
- Beige;
- Terracotta;
- Black;
- Pink;
- Monochrome and two-tone design.
Now you have some ideas about colors, don’t you? You can create something interesting and unique with any color combination from the list but be careful and don’t overuse one and only one color for everything in your kitchen.
When all the kitchen trends 2022 are learned, you probably have inspiration and you are ready to create a perfect design. You can take any style as a basis and add something to it that you like and it doesn’t matter what others say.
The Space Between Island And Counter — The Guide
A kitchen island has become an important part of a modern house as it helps to create an additional work surface. However, when you come up with an idea of kitchen renovation with an island, you become confused. You have no idea how much space between island and counter you need, do you? Keep reading this article and you will find out all the necessary information about this space.
When is a kitchen island a great idea?
A kitchen island is a large multifunctional table placed in the center of the kitchen space. When you start kitchen renovation and plan to install the island, you probably never think about the space between it and a counter. However, it’s important to consider how much free space in the kitchen you have before installing a kitchen island.
You should understand that it requires a significant area, which is difficult in a small apartment. In case your kitchen is tiny, it’s better to avoid large islands and pay attention to the smallest ones. If you have a big room you can choose between different types of islands and here are some of them:
- Island bar (bar counter);
- Island with cooking function;
- Island with washing function;
- Multifunctional island.
However, like everything else, they have their pros and cons. You need to pay attention to them, especially if your kitchen is small because there are not many options.
Advantages of kitchen islands
Such islands are becoming more and more popular nowadays. This is not surprising because the island in the kitchen is a useful and convenient way to apply the rules of ergonomics in the kitchen, and, in addition, a beautiful and stylish element of the interior. It has some advantages:
- Additional work surfaces and cabinets in the center of the room make cooking more convenient;
- The island zones the room visually and functionally;
- There is free access to the island from all sides, so it can be used as efficiently as possible;
- The kitchen with an island looks good and modern in any interior.
Disadvantages of the islands
Despite all the advantages, the islands also have some disadvantages which you need to consider before installing it in a small kitchen:
- Even a compact island requires free space for passages of sufficient width on all sides, so it takes a lot of space.
- It can be really complicated to install such islands because of bringing communications to the center of the room.
- You need to plan everything carefully. For instance, if you plan to install a stove on the island, you will have to take care not only of connecting to the power grid or gas but also of the hood on the ceiling in the center of the room.
The kitchen island is a great idea for large and medium-sized rooms, and it is not recommended to use it in the kitchens of compact urban apartments. Otherwise, it will be crowded in the kitchen. However, it is still possible.
Space between counter and island
When it comes to planning a kitchen and choosing a kitchen island, you should think carefully about how you usually use this space. Especially you need to think about how you would like to use the island as it will help you choose the right shape and size of your it.
While looking through different ideas, pay attention only to the design, not the size, as many people use islands for different reasons. Some people use it for cooking while others prefer using it instead of a table. So, all these reasons affect the space between counter and island in different ways.
Recommended space between island and counter
The very first thing you need to take into consideration is the total space in your kitchen. Experts say that in practice, the room needs to be 4x4m minimum. The larger an open plan area, the better it is for kitchen island placement.
The next important thing is the space between counter and island, and, of course, the ability to walk there. And it must be a key consideration because your functionality will depend on it. There are no renovation rules that you must necessarily follow. However, it’s better to avoid leaving more space than 1.2 meters. In this case, you will have the opportunity to move around your kitchen without difficulty.
Why do many people recommend no more than 1.2 meters of spacing? To start with, this size gives you enough room to prepare food, and it will be comfortable even for two people sharing this space. If you leave too much space, it can negatively affect the efficiency of your kitchen.
If you plan to locate one of the three functional zones on the island (cooking, washing, storage), it should be positioned in such a way relative to the rest of the kitchen. In this case, a so-called working triangle is formed. As a rule, approximately in the center of the linear kitchen or slightly offset. Taking this recommended size into consideration, the kitchen will be very convenient to use.
Maximum space between island and counter
When it’s time to create a plan for your future kitchen you may be wondering if there is the exact number for the distance between island and counter. In case you have a big kitchen, let’s find out about maximum space. It will help you choose the perfect kitchen island.
If you have a big family and you want an island for seating, then you should leave at least 1.5 meters of space around the kitchen island. Walkways can be as wide as you wish.
There are various factors that contribute to maximum space between island and counter, including the layout of the cabinets and appliances in your kitchen. The maximum distance between an island and the counter can be affected by the type of countertop in your kitchen as well.
Minimum space between island and counter
However, if you want to have a kitchen with an island, especially if you have a small one, you should keep in mind the minimum size of this room. The smaller the kitchen area, the less functional the island will be. The size of 1 meter is a minimal size of the space between island and counter suitable for small kitchens. This size allows things to remain practical and safe.
At the same time, small kitchens can benefit from small square-based islands that are both ergonomic and visually intriguing. Put such an island on the rollers, and you will have a convenient mobile option that you can remove from the center of the kitchen at any time when you need additional space.
Common mistakes in a kitchen island design
However, not all people plan kitchen renovation carefully and they make a lot of mistakes. Mistakes in kitchen island design can be costly and difficult to fix, so you have to do plan it before you start shopping for kitchen islands. It’s time for a new kitchen so don’t make these mistakes the first time around! Here are some of the most common mistakes:
Not considering the purpose of the island
Before you start installing the kitchen island, you must think about why you want to add it and how you can use it. The main purpose of the island will affect the width and depth. So it’s necessary if you have a small kitchen.
You have to decide if you want a kitchen island with or without seating, who will use the island, and what kind of utensils or appliances are you going to place on it.
The island is too big
One more common mistake is making the kitchen island too big for the room. The bigger this island, the smaller walkways. It means you will move around the kitchen with difficulties and if you have a big family it will be much harder to stay together.
If you want to create more space don’t forget to create some additional space for the kitchen island when you design your kitchen.
Not installing good lightning
If you use the kitchen island for cooking, then lightning is important because it can be really difficult to chop food in low-light conditions. If you want to avoid eye strain and prevent injury or accidents, you will need proper lighting in this work area.
Lighting is also important if you want to enjoy yourself during meal preparation. If you like to cook and prepare your meal, then you will probably spend some time at the kitchen island.
Lighting should not be neglected because it can make a huge difference in your cooking experience.
Not measuring appliances
When it comes to buying the island many people want to embed a stove in it. Unfortunately, there are people who forget to measure appliances before choosing the size of their island and its location and it leads to many further problems such as narrow walkways when all doors of kitchen appliances are open.
You can avoid these kitchen design mistakes by carefully planning your island before starting construction and asking a reliable contractor to help with the project.
The island can become an accent and center element that will create the whole image of the kitchen. That is why you should consider all details carefully when you plan to install the kitchen island. Especially think about the recommended size for the space between because it will be more convenient. It creates the right working triangle: you can take food from the refrigerator, put it on the island, wash it, slice it, and then send it to the cooking surface.
Dark And Dramatic Black Kitchen Cabinets
When it’s time to choose a design for kitchen cabinets you probably never think about the black ones. For many years white kitchens with gleaming surfaces have been fashionable. However, black kitchen cabinets are becoming more and more popular nowadays.
We definitely see a move away from ordinary white kitchens in the last few years. There is a trend to choose colorful kitchen cabinets as well as dark ones over the old-fashioned white options. In case black kitchens have drawn your attention lately but you don’t know how to make your project a reality, here are some ideas for you.
Decorating with black kitchen cabinets
The design of the black kitchen is distinguished by rigor and poise. Black means elegance and mystery at the same time. However, for your kitchen to look exactly like this, the black color in the room should be moderate.
Black kitchen cabinets make a classic style, so don’t be afraid that your kitchen will look too dark and dramatic.
Decorating with black cabinets can make it more practical and even fresh since black has its own distinctive features:
- Black contributes to the visual reduction of space, it is used fragmentally in the design of a small kitchen in the form of accents;
- Dark tones visually distance objects, thereby deepening or lengthening the room;
- This palette creates a calm and balanced atmosphere;
- Perfectly emphasizes other bright shades;
- Black is a psychologically compelling color;
- Black kitchen cabinets look great without high maintenance.
Black kitchen ideas
The advantages of black in the kitchen space were appreciated by architects, designers and decorators. Black emphasizes the silhouettes of the furniture, adds graphics, and feels almost unreal. Using black indoors requires skills and expertise, so the decision to create a black kitchen should be made consciously.
Keep in mind that black color can create a depressing atmosphere and depressing mood, so the use of dark tones in the design of rooms is a delicate matter.
All black kitchen?
Of course, you may want to make the kitchen completely in black and it can look not that bad. However, such a creative solution is acceptable only for large and spacious rooms.
In case your kitchen is small and you still have the dream of a dark kitchen, leave only one interior detail in black. For instance, it could be black cabinets or a black wall.
For large kitchens, “total black” style is possible, but still — only with some details in other colors, such as metallic, white, or other bright matching colors. Add some designer light or something wooden and it can give even a simple space glamor and chic.
Black kitchen cabinets with gold hardware
The black and gold combination always looks expensive and stylish. That is why many designers have been using this pair for a long time to create amazing projects. Decoration in such colors is, again, acceptable only in spacious kitchens. You can use black as the main color of the cabinets, and use gold in the design of the hardware.
Gold is what you need, as it gives the overall look warmth and a touch of rustic charm. This look lends itself to the modern farming style, which offers daring and decadent touches.
Black kitchen cabinets with white countertops
If you are not eager to use only black in the kitchen design, black kitchen cabinets with white countertops are what you need. The white countertop can dilute the abundance of black and enliven the interior. The white color will give the black kitchen cabinets lightness, even in case it’s applied only to horizontal surfaces. This combination has several advantages:
- Versatility. With this design, it is difficult to make mistakes in color combinations and it is easier to avoid coloristic mistakes.
- Reflections. White surfaces can reflect light, so a sense of spaciousness is created.
- Class. Black and white are classics. It always looks interesting and simple at the same time.
A solution with such a combination of colors will look great both in the classic version and in a daring high-tech style. It is suitable for kitchens of any size. These two colors successfully combine the possibilities for creating contrasting shades that provide a modern vision of the design of such an important part of the house.
Black cupboards
In case you just want to add an accent to the kitchen, it’s a great idea to install only black cupboards while countertops and other items can be of different colors which are combined with black. You see this more and more in modern design projects lately.
This option is perfect for large bright spaces where massive black cabinets will not look bulky and visually overload the space.
Matte black kitchen cabinets
For more effect, you can always use a matte finish. It’s worth remembering that matte black absorbs light and you’ll need additional lighting. Nonetheless, such darkened-out surfaces look impressive both in modern interiors and in classical styles.
Matte black cabinets can be made of natural wood or composite materials, but not all of them are resistant to scratches and high humidity.
One more feature of matte material is that matte cabinets are more practical in terms care, there are fewer fingerprints and water stains on them. Moreover, matte cabinets are resistant to the degrading effects of constant exposure to sunlight and retain their original appearance longer.
There are several cases when matte cabinets will look great:
- the room is spacious;
- the kitchen combines several colors at once;
- there is bright lighting or natural light.
When choosing black kitchen cabinets, try to leave fingerprints or get a little dirty and wipe them off, so you will see how the material will behave.
Flooring with black kitchen cabinets
You can use black color for walls, windows, and even for ceiling, but not the floor. It should be light (or, at least, have another color added) for one simple reason — the contrast with black cabinets.
The flooring you choose is critical to achieving your desired all-black kitchen.
Hardwood floors would compliment an apron-front sink, open storage. And manufacturing lighting would add to the warm, casual vibe of your antique-style kitchen.
Designers usually suggest making the base of the kitchen more neutral. Floor covering material in light tones looks very relevant. You can use oak or pine, for instance. A white floor will be appropriate only in a high-tech kitchen. In other cases, due to the excessive contrast, it will give the interior an unwanted office look.
Are black kitchen cabinets hard to keep clean?
We understand, the kitchen is the most functional place in the house. It’s easy to spill a sauce or drop a piece of food on the floor and your kitchen will no longer be pristine, especially if white color prevails in the design. After a while, you won’t be able to hide dirt and stains, no matter how good yuo are at cleaning and how often you work on it with a microfiber tissue.
In case you have black kitchen cabinets it’ll be much easier to preserve your kitchen’s original look. Black color is more resistant to basically everything. Although you’ll still have to clean dust and fingerprints, it won’t take a lot of time and can be done with just a wipe.
If you are fond of cooking, we bet your kitchen looks like a mess sometimes. Black cabinets may be your solution, as they’re generally easier to clean.
Will black kitchen cabinets go out of style?
The short answer is: no, they won’t! Just like white cabinets, black ones will also not go out of style for a long time.
All you need to remember is that you can combine different colors and materials with black cabinets in your kitchen design to make it more practical, there is no need to renovate it every year to be trendy.
When you take into account all the features of black kitchen cabinets and carefully choose the accessories, the design of your kitchen will remain truly original, stylish, and unusual for a long time.
The success depends entirely on the location, proportions, and your taste:
- If you have a big kitchen then you can easily use black color as the dominant one;
- With a small kitchen, it’s better to implement black cabinets into, for instance, a white kitchen to save visual space.
Not just cabinets, but all the lighter spaces in your kitchen will feel balanced with the addition of black cabinets. Don’t forget about additional lights, and you’ll enjoy your black kitchen cabinets for a long time.
Everything You Need To Know About Kitchen Sink Materials
Discovering which is the best kitchen sink for you based on budget, aesthetic, and ease-of-maintenance can depend on a number of things. You put hours into designing your dream kitchen, but did you allot enough time for choosing the right kitchen sink materials? It’s easy to be mesmerized by the beauty of today’s many options, but do you know enough about the various materials to make a lasting, regret-free choice for your home?
Choosing based on aesthetics alone may cause you to fall out of love with your kitchen renovation if functionality isn’t included in your decision process. Your sink is a central point in the space, used daily, and needs to work with the way you live.
It’s useful to review the must-know characteristics of today’s common kitchen sink materials.
Stainless Steel Kitchen Sinks
Found in most kitchens, stainless steel sinks offer many distinct advantages; they are durable, budget-friendly, and heat resistant. This could mean more money in your budget for those tiles you’ve had your eye on and less concern about treating your sink with kid gloves.
However, a disadvantage is that the “new and shiny” stage is fleeting since stainless steel is also prone to scratches. This seems to be less of a concern for serious cooks who have invested in high-end knives; they’d prefer the scratches be on the sink rather than their expensive tools.
Watermarks are a frustration for many. Even if the mineral content of your water source is not high, each spot will show up which requires diligent wiping to maintain a sparkly finish.
Another common complaint is that this kitchen sink material is noisy. Perhaps noise-level wasn’t on your radar when perusing the pretty showroom kitchens but a few months of listening to family members drop spoons into the sink might change your mind.
Of course, given the popularity of this material over the decades, solutions to these problems have been developed. You could opt for a brushed finish so that the little scratches won’t stand out as much. There are heavier gauge steel options that will be more resistant to both scratches and noise. Noise can also be minimized with the use of special sprays or even sound-absorbing pads underneath. According to Consumer Reports, this option tested particularly well.
Composite Kitchen Sinks
Composite is a mix of stone and resin which, like stainless steel, gives this kitchen sink material high marks for durability. (Durability can be challenged if dropped during shipping, but everyday use does not present an issue to this material’s longevity.)
If the idea of constant spot cleaning deters you, then composite could be a good choice. The darker tone of the stone better conceals watermarks and scratches, thus making these sinks particularly easy to care for. However, when it comes to a caveat for homes with particularly hard water, it’s better to choose an all-white material to avoid water marks.
Popular composites of granite kitchen sinks or quartz show up under well-known brand names like Cambria, Silestone, or Caesarstone.
Solid Surface Kitchen Sinks
This man-made material is available under many brand names, the most well-known of which is “Corian.” It is the easiest of all to keep clean and free of watermarks. While it is simple to maintain, one does need to be aware that these sinks can be scratched if subjected to sharp objects and can be damaged if exposed to high heat. It’s worth considering how much punishment your sink may take before making a final decision on a solid surface sink.
Enamel/Cast Iron Kitchen Sinks
Increasingly popular due to the growing farmhouse kitchen trend, these sinks score higher on aesthetics but lower on ease of maintenance and durability.
The enamel may be bonded to cast iron or to stainless steel. Stainless steel is the more budget option of the two varieties. While both options are prone to chips, the stainless steel enamel is particularly vulnerable if a weighty or sharp object is dropped.
It will also be important to assess the strength of your kitchen cabinets as the cast iron options are considerably heavy.
Natural Stone Sinks
Arguably one of the most beautiful kitchen sink materials is a natural stone such as slate, quartz, or granite. Of course, good taste comes with a price tag. These options come at a premium.
Natural stone also comes with a risk of staining. Granite, in particular, can darken in the water-contact areas and quartz is prone to scratches. Similar to enamel sinks, these materials are also very heavy and you’ll need to assess whether your cabinets can bear the weight.
Choosing The Best Kitchen Sink Design For You
Ideally, this guide has helped you narrow your decision to one or two options. One of the best ways to check the suitability of any material is to give it a trial run. Purchase a small piece of your desired product and then put it through the paces of daily life with your family. This way you can see for yourself how it may or may not wear in your home.
If you’re still feeling the tug of indecision, our team of expert kitchen designers is available to you. Based on their years of training and experience they will be well-poised to help you achieve the best possible result for your renovation project.
Small Kitchen Cabinets – What Are The Key Aspects To Know?
As millennials buy their first homes and empty-nesters downsize, apartments and townhouses are more popular than ever. However, these homes are more efficient and less expensive, so their footprints are smaller. Kitchens, in particular, are highly task-oriented, creating special design challenges. If you like to entertain, it’s even more important than a small kitchen to be well designed. A small kitchen can be made to function well and to appear larger than it is by using many different strategies. Small kitchen cabinets can go a long way in making a smaller-sized kitchen more functional.
1. Take Advantage of Small Scale Appliances
You don’t need a standard-sized refrigerator or dishwasher unless you have a really large family. Standard-sized refrigerators are usually 36 inches wide, although they can be larger. People rarely make use of all that space. You can find slimmer refrigerators that are 28 or 30 inches wide. They’ll hold all the essentials and keep a few days’ worth of produce nice and fresh.
Standard dishwashers are 24-inches wide, but you can instead buy a “condo-sized” one that’s only 18 inches wide. 6 inches might not seem like much, but visually it can make a big difference in cabinet storage.
2. Use Light Colors
Walls, cabinets, and floor surfaces should be white or light-colored to make your kitchen feel larger. Generally speaking, most rooms don’t have enough windows or sufficient light, and light is one important factor for visually expanding a room. Make the most of your existing space by choosing lighter finishes for cabinets, backsplashes, and flooring, as the light will reflect off of them.
Some people worry that light-themed kitchens will look boring or sterile. That is usually not a concern in a kitchen with limited space. In case it’s an issue, there are several options:
Explore different textures and materials.
Consider splashes of color, such as a contrasting color on the island. Choose another neutral color, even a dark one. In the end, however, it is best to keep the contrast low and stick with a single color family.
Here’s a bonus designer tip: it’s okay to break the rules if you know what you’re doing. A method that can work well when it comes to lighting is to use lighter surfaces in combination with darker ones.
In the small kitchen below, we used a lot of dark materials, especially on the lower cabinets and floor. But there are enough light and reflective surfaces higher up to give the kitchen a spacious feel. However, it wouldn’t be ideal for every space. Note that there are two large windows, one of which replaces a range hood.
3. Bright Lights
The correct lighting can help make your kitchen feel larger. Battery-powered LED pucks are an easy way to illuminate under-cabinet areas. You’ll also be able to see what you’re doing when you’re chopping and measuring! Adding LED pucks or strip lighting to the cabinet interiors can help illuminate the space inside and add depth.
4. Stretch The Space With Strong Lines
Everything in your kitchen creates a line. There are horizontal lines along with your countertop, vertical lines along the sides of cabinets, and the edge of the fridge. There are grout lines between tiles or between planks of flooring in hardwood.
These visual lines can work together to draw the eye deeper into the kitchen when they are combined effectively.It is possible to emphasize width, depth, and even height depending on the shape of your kitchen.
There are a few time-honored design tricks you can use to create strong lines:
Arrange tiles on your floor and your backsplash in a grid rather than stagger them like bricks.
Use a single line for the bottom of the upper set of cabinets, don’t vary heights around the room.
Stripes in the mat or runners can help you create the effect you want. Such methods are just tools in the designer’s toolbox; they’re not set in stone. For example, there are times when you would want to do a brick pattern in tiles because everything on a grid can be too much.
This is all to say that you should start seeing the kitchen as a set of lines, and which lines you use will depend on what proportions you wish to emphasize.
5. Choose Simpler Styles For Kitchen Cabinets And Hardware
It’s important to weed out elements that go against your color scheme when you’re trying to utilize the lines in your kitchen strategically. You may be able to use ornate crown molding and lots of curvy woodwork in a large kitchen. When used in a small space, it creates a cluttered look and breaks flowing lines.
You should go with slab doors (flat panels) or shaker-style doors (rectangular frames without bevels) for a cleaner effect.
Simple, straight lines are best for hardware. You can also use cabinets without hardware, such as the touch-activated cabinets in the example above.
6. Open Up The Upper Cabinets
In most kitchens, there isn’t enough space to get rid of the upper cabinets completely. However, It is possible to put open shelving with cabinets to help direct the eye to the back wall. Likewise, glass-fronted cabinets (clear or frosted) can do the same thing. You should keep the arrangement tidy to avoid ruining the effect.
7. Don’t Box In The Range Hood
Installing a range hood with a vent that’s meant to be seen means you don’t have to box it in with cabinets. This creates a better sense of depth since it allows the eyes to reach the back wall.
8. Undermount Sink
A great method to reduce extra visual detail is to choose an under-mounted sink. Without the metal lip showing over the counter, you can reduce the number of lines that interfere with the feel and look of your kitchen.
9. Share Space With Another Room
By removing a wall between your kitchen and an adjoining room, you can give your kitchen a more spacious feel because you can see further. In the kitchen above, the storage is shared with the dining area, and the island is shared with the living area.
10. Remove Clutter
This may sound obvious, but we encounter this all the time. If you have a small kitchen, it’s best to keep the decorative items to a minimum. Kitchens are often very cluttered spaces, with all the dishes, knives, and other basic appliances left out on the counters. If your kitchen is cluttered more with unessential decorative items, it won’t just be messy, it will also be difficult to clean and cook in.
Choose A Great Designer
A small kitchen requires even more attention to detail. A small kitchen that functions well will require an experienced designer since every home presents unique challenges. Embracing and nurturing talent is part of our culture at Laurysen, which has led to a team of talented award-winning designers. Find out more about our designers and how they create kitchens that work well, look beautiful, and match your personal style.
Kitchen cabinet designs for small kitchens can go a long way in ensuring better organization and tidiness. You’ll always want to do your research when looking into the best cabinets for small kitchens, and you’ll find yourself more educated when the time comes to doing your renovation project.